Directional Drilling
Guidelines For a Successful Directional Crossing Bid Package |
| The Directional Crossing Contractors Association (DCCA) has been addressing the issue of what information should be made available to contractors and engineers so that future projects proceed as planned. Crossings of rivers and other obstacles using directional drilling techniques are increasingly being utilized around the world. As in any construction project, it is necessary for the contractor to have as much information as possible to prepare a competitive and comprehensive proposal and to be able to successfully install the crossing. Better pre construction information also allows the work to be undertaken more safely and with less environmental disturbance. |
I. OVERVIEWA. DEVELOPMENT AND USES - Originally used in the 1970s, directional crossings are a marriage of conventional road boring and directional drilling of oil wells. The method is now the preferred method of construction. Crossings have been installed for pipelines carrying oil, natural gas, petrochemicals, water, sewerage and other products. Ducts have been installed to carry electric and fiber optic cables. Besides crossing under rivers and waterways, installations have been made crossing under highways, railroads, airport runways, shore approaches, islands, areas congested with buildings, pipeline corridors and future water channels.
|
 |
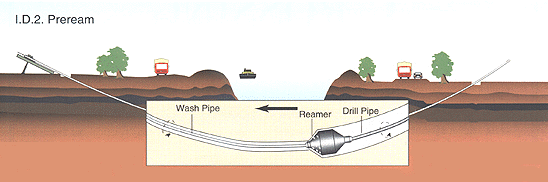
| 2. Preream- Once the pilot hole is complete; the hole must be enlarged to a suitable diameter for the product pipeline. For instance, if the pipeline to be installed is 36 in. diameter, the hole may be enlarged to 48 in. diameter or larger. This is accomplished by "prereaming" the hole to successively larger diameters. Generally, the reamer is attached to the drill string on the bank opposite the drilling rig and pulled back into the pilot hole. Joints of drill pipe are added as the reamer makes its way back to the drilling rig. Large quantities of slurry are pumped into the hole to maintain the integrity of the hole and to flush out cuttings. |
 |
| 3. Pullback- Once the drilled hole is enlarged, the product pipeline can be pulled through it. The pipeline is prefabricated on the bank opposite the drilling rig. A reamer is attached to the drill string, and then connected to the pipeline pullhead via a swivel. The swivel prevents any translation of the reamer's rotation into the pipeline string allowing for a smooth pull into the drilled hole. The drilling rig then begins the pullback operation, rotating and pulling on the drill string and once again circulating high volumes of drilling slurry. The pullback continues until the reamer and pipeline break ground at the drilling rig. |
 |
II. LAYOUT AND DESIGNA. ACCESS - Heavy equipment is required on both sides of the crossing. To minimize cost, access to either side of the crossing should be provided with the least distance from an improved road. Often the pipeline right-of-way is used for access. All access agreements should be provided by the owner. It is not practical to negotiate such agreements during the bid process.
|
 |
| 2. Pipe Side - Strong consideration should be given to provide a sufficient length of work space to fabricate the product pipeline into one string. The width will be as necessary for normal pipeline construction although a work space of 100-ft. wide by 150-ft. long should be provided at the exit point itself. The length will assure that during the pullback the pipe can be installed in one uninterrupted operation. Tie-ins of successive strings during the pullback operation increase the risk considerably because the pullback should be continuous (Figure 3). |
 |
|
C. PROFILE SURVEY - Once the work locations have been chosen, the area should be surveyed and detailed drawings prepared. The eventual accuracy of the drill profile and alignment is dependent on the accuracy of the survey information. III. GEOTECHNICAL INVESTIGATIONA. NUMBER OF BORINGS- The number of exploration holes is a function of the proposed crossing length and the complexity of the strata. If the crossing is about 1,000 ft. a bore hole made on each side of the crossing may suffice. If an examination of these borings indicates that conditions are likely to be homogeneous on both sides, it may not be necessary to conduct further sampling. If the report indicates anomalies discontinuity in the strata, the presence of rock or large concentrations of gravel it is advisable to make additional borings to better define the strata. Longer crossings (especially large diameter pipelines) that indicate gravel, cobble, boulders or rock should have samples taken about 600-800 ft. apart unless significant anomalies are identified that might necessitate more borings. All borings should be located on the crossing profile along with their surface elevations being properly identified. If possible the borings should be conducted at least 25 ft. off of the proposed centerline. The bore holes should be grouted upon completion. This will help prevent the loss of drilling slurry during the crossing installation.B. DEPTH OF BORINGS - All borings should be made to a minimum depth of 40 ft. below the lowest point in the crossing or 20 ft. below the proposed depth of the crossing, whichever is greater. In some instances, it may be beneficial to the owner and the contractor to install the crossing at a greater depth than the owner requires for his permit. It is suggested that all borings be through the same elevation to better determine the consistency of the underlying material and note any patterns which may be present. C. STANDARD CLASSIFICATION OF SOILS - A qualified technician or geologist should classify the material in accordance with the Unified Soil Classification System and ASTM Designations D-2487 and D-2488. It is beneficial to have a copy of the field drilling log completed by the field technician or driller. These logs include visual classifications of materials as well as the driller's interpretation of the subsurface conditions between samples. D. STANDARD PENETRATION TEST (SPT) - In order to better define the density of granular materials the geotechnical engineer generally uses the Standard Penetration Test (SPT), in general accordance with ASTM Specifications D-1586. This is a field test that involves driving a 2-in. split spoon sampler into the soil by dropping a hammer of a specific weight (usually 140 LB) a specified distance (usually 30 in.) to determine the number of blows necessary to drive the sampler 12 in. In very dense soils, the field technician may note the number of blows required to drive the sampler less than the required 12 in. (i.e., 50 blows for 3 in.). The number obtained is the standard penetration resistance value (N) and is used to estimate the in situ relative density of cohesion less soils. Some geotechnical firms will conduct these penetration tests in cohesive materials and rock, and to a lesser extent, the consistency of cohesive soils and the hardness of rock can be determined. E. THIN WALLED "SHELBY" TUBE SAMPLING - Most geotechnical firms prefer to use a Thin walled Tube Sampling method for obtaining samples of cohesive materials. These tests are conducted in general accordance with ASTM Specification D-1587. This test is similar to the Standard Penetration test except the sample is collected by hydraulically pushing a thin-walled seamless steel tube with a sharp cutting edge into the ground. The hydraulic pressure required to collect the sample is noted on the field log. This produces a relatively undisturbed sample that can be further analyzed in the laboratory. These samples can be field tested with handheld penetrometers, but more accurate readings of density and consistency can be obtained by performing unconfined compressive strength tests where the results are noted in tons per square foot. Generally, for directional drilling contractors a standard penetration test using the split spoon sampler described above will suffice in both materials. F. SIEVE ANALYSIS OF GRANULAR MATERIALS - A sieve analysis is a mechanical test of granular materials performed on samples collected in the field during the standard penetration test with the split spoon sampler. The split spoon samples are taken to the laboratory and processed through a series of screens. The sample provides a percentage analysis of the granular material by size and weight. It is one of the most important tests undertaken. G. ROCK INFORMATION - If rock is encountered during the soils investigation borings, it is important to determine the type, the relative hardness and the unconfined compressive strength. This information is typically collected by the geotechnical drilling firm by core drilling with a diamond bit core barrel. The typical core sample recovered with this process has a 2-in. diameter. The type of rock is classified by a geologist. The geologist should provide the Rock Quality Designation (RQD) which rates the quality of the rock based on the length of core retrieved in relation to the total length of the core. The hardness of the rock Mohs' Scale of Hardness) is determined by comparing the rock to ten materials of known hardness. The compressive strength is determined by accurately measuring the core and then compressing the core to failure. This information pertaining to the underlying rock formation is imperative to determine the type of down hole equipment required and the penetration rates that can be expected. IV. PIPE MATERIAL SELECTIONA. WALL THICKNESS -D/T "RULE OF THUMB" - The following table provides generalized recommendations for the selection of steel pipe wall thicknesses relative to pipe diameter. These recommendations are meant to be used only as a starting point in the design. It is recommended that in the final design, specific stresses be calculated and compared with allowable limits.Diameter (D) Wall Thickness (T) 6 in and smaller 0.250 in. 6 to 12 in. 0.375 in. 12 to 30 in. For 30 in and larger, D/t < 50 (For high-density polyethylene (HDPE) pipe, a standard dimension ratio of D/t, SDR, of 11 or less is recommended and the pipe manufacturer should be consulted). B. STRESS ANALYSIS - In finalizing the design, the stresses imposed during construction and in-service must be calculated and checked to be within allowable limits for the grade of material. The stresses at each stage must be considered acting individually and in combination. Stresses result due to spanning between rollers prior to pullback, the hydrostatic testing pressures, pulling forces during installation, radius of curvature as the pipe enters the ground, the drilling profile curvature, external pressures in the drilled hole, and the working pressure. 1. Pre-installation a. Hoop and longitudinal stresses resulting from hydrostatic testing are calculated. b. Using the known distance between rollers as the free spanning distance, the maximum hogging and sagging moments can be calculated. Considering the greater of these two moments, the maximum spanning stress is calculated. Note: during hydrostatic testing the pipeline will be full of water therefore the additional weight of water must be included in these calculations. 2. Installation a. The spanning stresses calculated in stage 1.b. also apply in this installation phase. b. The theoretical pulling force must be determined in order to provide the stresses that will result. An assumed down hole friction factor of 1.0 is recommended to provide conservative results and to include the effect of the pipeline being pulled around a curve. The maximum predicted pulling force should then be used in calculating the resulting longitudinal stress. c. Allowing for a 10% drilling tolerance, leads to the use of a radius of curvature 90% of the design radius when calculating the longitudinal curvature stresses. d. External pressure from static head in the drilled hole and/or overburden pressures must be considered. It is recommended that the static head resulting from the maximum envisaged drilling fluid density should be used with a factor of safety of 1.5 to provide conservative estimations of resulting hoop and longitudinal stresses. 3. Post-installation a. The longitudinal curvature stresses calculated for stage 2.c. above are used again here. b. External pressure stresses from 2.d. apply. c. Hoop and longitudinal stresses resulting from the final hydrostatic test are calculated. 4. In-service a. Curvature -see 2.c. b. External pressure -see 2.d. c. The maximum working pressure of the pipeline is used in calculating longitudinal and hoop stresses that will be imposed during service. C. ALLOWABLE STRESSES - Having determined the individual and combined stresses at each stage of construction and those for the in-service condition, they must be compared with allowable limits. 1. ASME B31.8 -1992, Table A842.22 provides the following limits: - Maximum allowable longitudinal stress: 80% SMYS. - Maximum allowable hoop stress: 72% SMYS. - Maximum allowable combined stress: 90% SMYS. (Where SMYS is the Specified Minimum Yield Strength of the pipe material). 2. Regulatory bodies may impose additional limits to those specified above - owner companies should identify any such further constraints and ensure the adequacy of the design. V. PIPELINE COATINGA. INTRODUCTION - Coatings are applied to provide a corrosion barrier and an abrasion barrier. Directional crossings generally encounter varying materials and often can be exposed to extra abrasion during the pullback. An outer abrasion resistant overcoat is often warranted. To facilitate the pullback of the pipeline the coating should bond well to the pipe to resist soil stresses and have a smooth, hard surface to reduce friction and maintain the corrosion barrier. As in any pipeline construction, the recommended external coating system should be compatible with any specifications for the field joint coating or any internal coating.B. PIPE COATING - The recommended pipe coating is mill applied fusion bonded epoxy (FBE). The recommended minimum thickness is 20 mils. C. JOINT COATING - The coating application of the weld area is the most critical field operation to maintain a smooth abrasion-resistant pipe string. It is recommended that the girth weld be coated with FBE powder utilizing the induction heating coil and powder application machine to a minimum dry film thickness of 25 mils. As an alternate, two component catalyzed liquid epoxy may be applied to the girth weld area to a minimum dry film thickness of 25 mils using a paint brush or roller. Tape should never be used for joint coating on the pullback portion of a directional crossing. D. COATING REPAIR - It is recommended that small coating damaged areas be repaired with a polymeric melt stick patching material. Holidays larger than 1 in. in diameter should be repaired utilizing the two component catalyzed liquid epoxy applied with a paint brush or roller. Tapes should never be used for repair of coating damaged areas on the pullback portion of a directional crossing. E. ABRASION RESISTANT OVERCOAT - As an extra abrasion resistant barrier for crossings that may encounter stones, boulders or solid rock it is recommended the FBE coated pipeline be over coated with an epoxy-based polymer concrete. The material should be applied at a mill or with a portable yard coating machine to a minimum thickness of 40 mils. Girth weld and coating damaged areas should be field coated using an epoxy-based polymer concrete compatible with the overcoat material. The patch material should be applied so the material tapers uniformly and feathers into the original coating. Stability of the pipeline in drilled crossings is not normally a concern so a Portland cement type concrete coating is not recommended. Vl. DRILLING SLURRY - CONTAINMENT, RECYCLING AND DISPOSALA. BACKGROUND - The directional crossing process requires the use of large volumes of slurry that provide the following functions:1. Hydraulic cutting with a jet. 2. Provide energy to the drill motor. 3. Lubricate the cutting head. 4. Transport drill cuttings to the surface. 5. Stabilize the hole against collapse. 6. Guard against loss of slurry into surrounding formations. B. SLURRY COMPOSITION -The slurries most commonly used are bentonite based. Bentonite is a naturally occurring Wyoming clay known for its hydrophilic characteristics. Often polymer extenders are also added to enhance certain characteristics. Material Safety Data Sheets (MSDS) are readily available from suppliers and can be presented to regulatory/disposal authorities. C. CONTAINMENT - The slurry is pumped down hole and circulates back to the surface and collected in "return pits." These pits typically have a volume of at least 500 cu ft. Depending on the nature of the project, the slurry is pumped from the return pits to a "settling and containment pit." These pits vary in size depending on pumping rates and contain the slurry for recycling or disposal. D. RECYCLING SLURRY - Slurry that has been circulated down hole and collected in the containment pit is then passed through machinery that separate the cuttings from the slurry. This process involves a series of shaking sieves and various size hydroclones. E. SLURRY AND CUTTINGS DISPOSAL - Significant amounts of slurry are normally disposed of at the end of a project. Economics for disposal is extremely site specific. This slurry can be disposed of by: 1. Use at another drilling location. 2. Spread onto raw land for water retention improvement. 3. Evacuate to a dump site. If working in an area of contaminated ground, the slurry should be tested for contamination and disposed of in a manner which meets governmental requirements. F. COST MITIGATION FOR THE OWNER - With pre bid planning and research, the owner can realize significant savings in slurry disposal. It is in the owner's interest to define and specify all disposal issues. In particular: 1. Define an approved disposal site as part of the project specifications. 2. Because it is difficult to estimate disposal quantities, disposal should be a separate bid item as either "cost plus" or on "unit rates." 3. Inadvertent returns are not uncommon and difficult to predict. The issue should be fairly represented to permitting bodies prior to construction. Contingency plans for containment and disposal of inadvertent returns should be priced as a separate bid item and agreed prior to construction. Vll. CONDITIONS OF CONTRACTAlways utilize a written contract to maximize communication and minimize controversy. A contract should be used to anticipate what the parties intend to do if a problem occurs on the job. The contract should be readable and understandable.A. The Bid Package - A proposal presented by a contractor to the owner is an offer by the contractor, that becomes a binding contract if accepted by the owner. The parties, price and performance must be specified. Define the project to be undertaken by detailing the scope of work and incorporate all plans and specifications from the bid package. B. DIFFERING GROUND CONDITIONS AND WALKAWAY PROVISION - Owners should accept the responsibility of performing an adequate geotechnical investigation. Despite adequate testing of ground conditions, unknown, unusual, and/or unexpected ground conditions may be encountered. The contract should provide solutions when the project encounters differing ground conditions. The walkaway provision in the contract should entitle the contractor to stop work and walk away from the job without the owner having the right to take over the contractors equipment. The contractor should be entitled to receive compensation for demobilization, lost profits and work performed prior to walkaway. If the project is completed, the contractor should be paid on a cost-plus basis. Assumption of risk of unforeseen ground conditions by the contractor affects the bid price. C. ENVIRONMENTAL CONCERNS - Before the project begins, address environmental concerns because owners and contractors are included as potentially responsible parties when environmental damages and cleanup costs are assessed. Federal, state and local laws must be evaluated and licensing, permitting and other regulations must be followed. Directional crossings that damage soil or water may cause liability. 1. Turbidity of Water and Inadvertent Returns - As these events are difficult to predict and work stoppage may occur, the contract should offer a mechanism to mutually address and mitigate the problem. Liabilities are generally shared by both the contractor and owner and many times can be insured. 2. Slurry Disposal - Comply with the regulations of the area regarding slurry disposal. Slurry disposal should be referred to in the contract and bid as a separate line item on a cost plus or unit price basis. D. ALLOCATION OF RISK OF LOSS - Evaluate and allocate risks of loss that may occur during the project. Owners should share the risk of loss rather than shifting all the losses through the indemnification to the contractor because the bid price is directly affected by contingent losses. Insurance may provide coverage by third parties for losses from differing ground conditions or environmental losses. E. DISPUTE RESOLUTION - Provide for dispute resolution in the event of controversy by including mediation or arbitration provisions in the contract. Disputes should be resolved in the following order: 1) negotiation, 2) non binding mediation through a third party, 3) binding arbitration and lastly, 4) litigation. Determine who should be parties to the resolution, what law will be used and where the dispute will be resolved. |